Hidden single in Sudoku: the digit with one square left
Two ways to find a forced digit
Both singles below force a digit into a square, and both are on the same board. The difference is which end you start reading from.
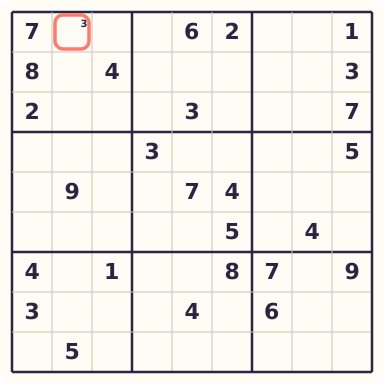
A naked single starts at the square. In row 1, column 2, the digits already sitting in that row, column and box leave only 3. One candidate, one square, nothing to weigh up.
A hidden single starts at the digit. Take box 4 as it stands at the start of the board and ask where a 4 could still go. Eight of its squares are empty, and seven of them are out, because each already shares a row, column or box with a 4. That leaves row 4, column 2.
The same board, read the other way
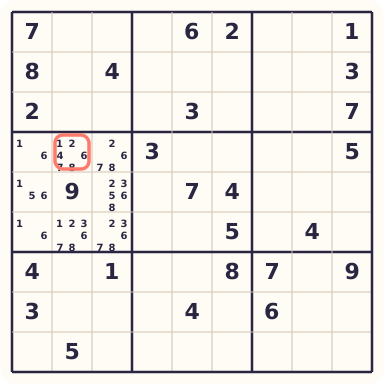
The second figure is that same starting position with the candidates of box 4 written in. Every empty square in the box shows what could still go there, and the digit 4 turns up in exactly one of them.
That is the whole move. The square it lands on still carries 1, 2, 4, 6, 7 and 8, so nothing about the square itself says 4. What says 4 is the box: no other empty square in it can take one.
This is why the technique is worth knowing separately from naked singles. A naked single announces itself, because the square has run out of alternatives. A hidden single is invisible until you pick a digit and follow it around a unit.
How crowded the square usually is
That six-candidate square is close to the worst case, and it is not the typical one. Running the solver over 200 hard boards and looking at every hidden single it played, 2,431 moves in all, the square it lands on carries three candidates most often (38.5% of moves), then four (25.9%) and two (24.6%). Five candidates is 8.3%, and six or more is under 3%.
The first hidden single of a board skews slightly higher, around four candidates, because early on the grid is looser and squares still hold more options.
So the square does not have to look terrifying. It only has to hold more than one candidate, which is the case for any hidden single. The reading work is in the unit, not in the square.
What the placement does to the rest of the board
Placing a digit takes it out of every other empty square in its row, column and box. On most hidden singles that shows up immediately: across those 200 hard boards, 78% of the moves crossed the digit off at least one other square.
This board is one of the 22% where it does not. Put the 4 in row 4, column 2 and nothing else changes, because no other empty square in that row, that column or box 4 was still holding a 4 as a candidate. The move fills a square and unlocks what follows, but you will not see a single pencil mark disappear.
Both outcomes are normal. A placement that clears nothing is not a sign you picked the wrong move.
How often each kind turns up
Naked singles and hidden singles are not equally common, and the balance between them shifts once boards get past the easy tier. The numbers below come from running the same solver over 200 boards per level, seeds 1000 upward. The solver always plays a naked single when one exists and only looks for a hidden single when none does, so a hidden single here is a position where no naked single was available.
On easy boards a hidden single is nearly optional. Three of the 200 boards needed one, and the solver averaged 40.9 naked single moves against 0.1 hidden single moves.
Medium boards reverse it. 199 of 200 needed at least one hidden single, averaging 10.1 of them against 38.9 naked single moves, with the first arriving after an average of 6.7 placements.
Hard boards need one every time, all 200 of them, averaging 12.2 hidden single moves against 42.8 naked single moves and reaching the first after just 3.3 placements.
Read those as two clocks running. On a hard board the first hidden single arrives after an average of 3.3 placements, though that average hides a split: nearly four boards in ten open with a hidden single as their very first move, and the rest usually start with a short run of naked singles. After that first one, hidden singles arrive in runs rather than alternating: across those 200 boards, whenever one single follows another, the next is the same kind about nine times in ten.
Scan the square, then the digit
Sweep for naked singles first, since they are cheaper to see and there are more of them. When that sweep comes up empty, switch to reading digits rather than squares: pick a digit, walk it through a box, then down a column and along a row.
The solver checks boxes before rows and columns. A 3x3 box is the smallest thing to hold in your head at once, so start there.
The mistake on a hard board is staying in square-reading mode too long. Reading square by square finds naked singles and nothing else, and on a hard board that source dries up fast: nearly four boards in ten had no naked single available at the very start. The other mistake is skipping past a square because it looks crowded. The six-candidate square in the figures above is the one that gives you the 4.
If the candidate lists themselves are what slow you down, Snyder notation cuts them to the marks that matter. Hidden pairs is the next step up, the first technique that removes candidates without placing a digit, and how to solve a hard Sudoku without guessing lists what else those boards ask for. You can practise the whole thing on the Sudoku game here, or start a hard board and count how many digits go in before you have to switch away from reading squares.
Questions
What is the difference between a naked single and a hidden single?
They are the two mirror images of a forced digit. Read from the square's side, only one number is still standing there. Read from the digit's side, every other cell in its unit is ruled out for it.
How often does a Sudoku need a hidden single?
It depends almost entirely on the difficulty. Over 200 boards of each level generated for this site, nearly every easy board was solved without one, while essentially every medium and hard board called for one somewhere.
What is the next technique after hidden singles?
On hard boards from this site, pointing pairs and naked pairs remove candidates once singles slow down. Learn those before wing patterns.